Open topic with navigation
(continued from Message Parameters)
Editing Screen Basics
The editing screen is the same regardless which section of a message template is being formatted.
|

|
The editing screen shown in Screen Shot 198: Message Template Screen following is common throughout Tourplan for message editing, note creation etc. It is a mini word processor screen, and its capabilities should not be confused with those of a true word processor. There are limitations to its functions.
|
Screen Shot 198: Message Template Screen
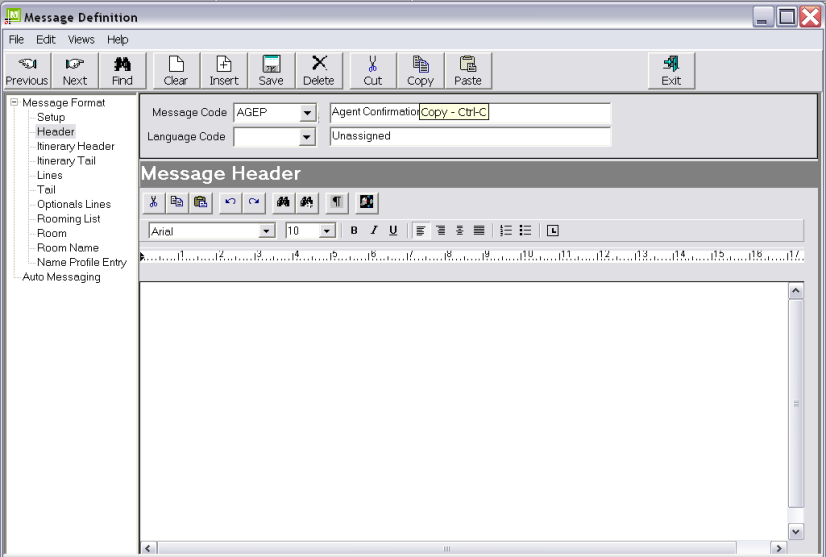
The Editing screen has the following items:
 Cut. (Ctrl X). Highlight the text to be cut and click this button
 Copy. (Ctrl C). Highlight the text to be copied and click this button.
 Paste. (Ctrl V). Place the cursor at the point where copied/cut text is to be placed and click this button.
 Undo. Undo the previous action(s). Click multiple times for multiple actions
 Redo. Redo the previous action(s). Click multiple times for multiple actions
 Search. Opens a dialogue box for search text to be entered. Search is on the current page only.
 Replace. Opens a dialogue box for Search and Replace text to be entered. Search and Replace is on the current page only.
 Show Codes. Turns on hidden formatting codes—Tabs, Carriage Returns etc.
 Insert Hyperlink. See Using Hyperlinks.
 Font and Font Size. The available fonts are the Windows fonts installed on the computer running Tourplan.
 Bold. Highlight the text to be bold faced and click this button.
 Italic. Highlight the text to be italic and click this button
 Underline. Highlight the text to be underlined and click this button.
 Left Justify. Click this button to justify text on the left margin.
 Right Justify. Click this button to justify text on the right margin.
 Centre. Click this button to centre text between the left and right margins.
 JustifyClick this button to justify left and right between the margins.
 Numbering. Click this button to create a numbered list.
 Bullets. Click this button to create a bulleted list.
 Tabs. Click this button to set the type of tab stop required. Then position the cursor in the ruler bar where the tab stop is to be placed and click. There are 5 different types of tab stop available. To select a different tab type, click the tab symbol until the required tab symbol displays.
 Left Tab (Default). The text begins at the tab stop.
 Right Tab. The text ends at the tab stop.
 Centre Tab. The text is centred on the tab stop.
 Decimal Tab. Numeric values centre the decimal point at the tab stop.
 End of Line. Justifies text to the extreme right of the page. Cannot be moved from that position. Clears any tab stops to the right of it.

Ruler Bar. To remove Tabs, hold the mouse pointer over the tab, hold down the left mouse button, drag the tab away from the ruler bar and drop. Tabs can be adjusted by drag and drop. When a tab is selected (by holding the mouse pointer over it and holding down the left mouse button), the current position of the tab stop will display at the left hand end of the ruler bar, and this value will change as the tab is dragged.
(continued in Messaging Tips & Hints)
Open topic with navigation
